Part 2: Configuring VPS and DNS
Since I only own one domain, I want to utilize subdomains to serve different websites. As you can see, this site is hosted under blog.minhperry.de, and the Skyblock site is under skyblock.minhperry.de. This guide will walk you through how to set up multiple subdomains under a single VPS host.
Prerequisites
- You have already shared your
sshkey with your VPS provider. - You have basic knowledge of working with the Linux terminal.
- You already have an
nginxserver installed, along withcertbotfor SSL certificates. - You have access to your domain’s DNS panel. In this case, I have also proxied it through Cloudflare for extra protection.
This guide is for setting up an Nginx server on an Ubuntu 24.04.1 VPS. I am logged in as the root user, so all sudo commands are omitted here. Add sudo before every command if you are not logged in as root.
DNS Routing
First, create a DNS A record with the following content:

Setting the name as * will match all subdomains (e.g., *.example.com), but not the top-level domain (TLD) example.com. To match the TLD, you need to use the @ selector. You can also use a CNAME record to alias a subdomain to another domain, rather than pointing to an IP address like an A record.
Adjusting the Firewall
Before anything else, we need to adjust the firewall to allow access to Nginx. Just follow this DigitalOcean guide.
Optionally, you can also deny HTTP traffic by blocking Nginx HTTP access through the firewall, forcing only HTTPS traffic:
ufw deny 'Nginx HTTP'SSL/TLS and Nginx Configuration
With SSL/TLS, my website can be served safely over the internet, using the HTTPS protocol. Here, I use Let’s Encrypt with the help of Certbot, following this guide:
Step 1: Generating the Wildcard Certificate
sudo certbot certonly --manual --preferred-challenges=dns --server https://acme-v02.api.letsencrypt.org/directory --agree-tos -d '*.yourdomain.net'Follow the prompts and add a DNS TXT record to prove your ownership. The certificate (fullchain.pem) and its private key (privkey.pem) will be stored under /etc/letsencrypt/live/yourdomain.net. This certificate lasts for 90 days, and you can renew it near the end with certbot renew --nginx.
Step 2: Configuring Nginx
If you are not familiar with Nginx, I recommend reading the beginner’s guide first. Otherwise, let’s get straight to the point.
Upon installation, Nginx will drop a default config file in its config folder, which looks like this:
server {
    listen 80 default_server;
    listen [::]:80 default_server;

    # SSL configuration
    #
    # listen 443 ssl default_server;
    # listen [::]:443 ssl default_server;
    #
    # Note: You should disable gzip for SSL traffic.
    # See: https://bugs.debian.org/773332
    #
    # Read up on ssl_ciphers to ensure a secure configuration.
    # See: https://bugs.debian.org/765782
    #
    # Self-signed certs generated by the ssl-cert package
    # Don't use them in a production server!
    #
    # include snippets/snakeoil.conf;

    root /var/www/html;

    # Add index.php to the list if you're using PHP
    index index.html index.htm index.nginx-debian.html;

    server_name _;

    location / {
        # First attempt to serve the request as a file, then
        # as a directory, and fall back to displaying a 404.
        try_files $uri $uri/ =404;
        # proxy_pass http://localhost:8080;
        # proxy_http_version 1.1;
        # proxy_set_header Upgrade $http_upgrade;
        # proxy_set_header Connection 'upgrade';
        # proxy_set_header Host $host;
        # proxy_cache_bypass $http_upgrade;
    }

    # ... and more
}
Here, I wanted all subdomains to default to an Nginx 404 page for now. After removing unnecessary configurations and adding the SSL certificate, here’s the final result:
server {
    # Technically, these can be removed because we don't allow HTTP
    # through port 80, so there's nothing to listen to.
    listen 80 default_server;
    listen [::]:80 default_server;

    # SSL configuration
    listen 443 ssl default_server;
    listen [::]:443 ssl default_server;

    # Default Nginx HTML example file
    root /var/www/html;

    # Use the wildcard generated SSL certificate
    ssl_certificate /etc/letsencrypt/live/minhperry.de/fullchain.pem;
    ssl_certificate_key /etc/letsencrypt/live/minhperry.de/privkey.pem;

    # List of index files to search for
    index index.html index.htm index.nginx-debian.html;

    # Catch-all block for any non-specified domain,
    # since _ is an invalid domain that will never match anything.
    # Refer to https://nginx.org/en/docs/http/server_names.html
    server_name _;

    # For now, return a 404. You can implement a custom mechanism.
    return 404;
}
For each subsequent subdomain, create a text file in the same folder as the default config above. Each file will be responsible for the subdomain. This site uses this configuration:
server {
    # Listen on IPv4 or IPv6 based on your DNS configuration.
    # However, IPv4 is more widely used, so it's preferred.
    listen 443 ssl;

    # Specify subdomain here. This will match the exact subdomain.
    server_name blog.minhperry.de;

    # Use the same SSL certificate
    ssl_certificate /etc/letsencrypt/live/minhperry.de/fullchain.pem;
    ssl_certificate_key /etc/letsencrypt/live/minhperry.de/privkey.pem;

    # Root where your built index.html is located.
    root /var/www/frontend/blog;
    index index.html index.htm;

    # If you didn't notice, root is always redirected to /about.
    location = / {
            return 301 /about;
    }

    # Optionally, enable error logging if needed.
    # error_log /var/log/nginx/blog_err.log;
}
One crucial thing is that the specified root folder must be readable by the www-data group in Nginx. You can test this with:
sudo -u www-data stat /absolute/path/to/specified/rootStep 3: “Activating” the Subdomain
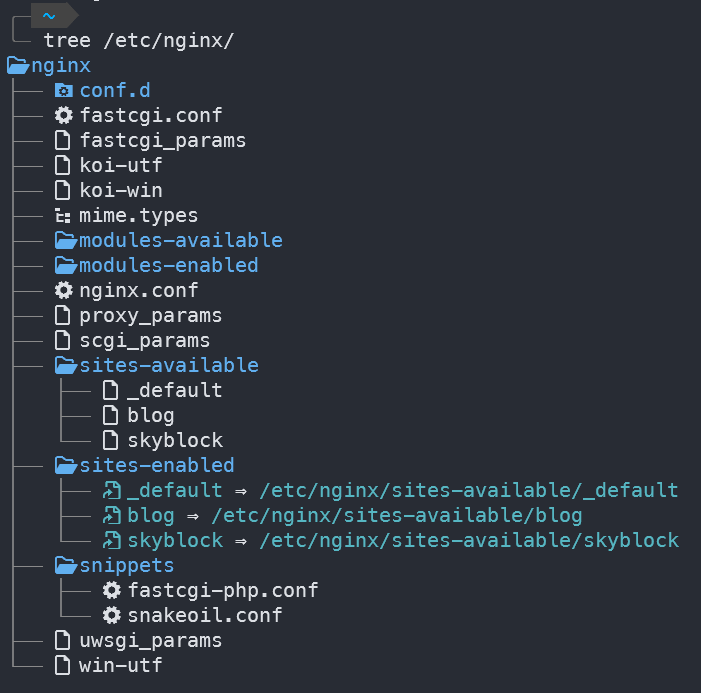
Since all configurations are in sites-available, this only informs Nginx that they are available to be served. To activate those subdomains, create a symbolic link of each config in sites-enabled:
ln -s /etc/nginx/sites-available/<data-name> /etc/nginx/sites-enabled/And that’s it. You’re done. The final result should look like this: